Two quick pieces of scenery
This time the idea is to make two pieces of scenery mounted over a spare CD as quick and good looking as possible, the first of them uses plaster pieces casted using Hirst Arts molds (www.hirstarts.com), that's something that obviously everyone hasn't at home, but I sincerely recomend; the other one uses foamcore board and five spare 2x2cm miniature bases that almost everyone has plenty at home.
The project starts in the morning and ends the same day (only spent a morning and two more hours to be completed), and, not like other projects, this time I started building without any sketch or plans, it is just a "lets see what can I glue over a CD" project.
Dos piezas rápidas de escenografía
Esta vez la cosa trata de hacer dos piezas de escenografía montadas sobre un CD de la forma mas rápida y a la vez vistosa posible, una de ellas utiliza piezas vaciadas en escayola usando los moldes de Hirst (www.hirstarts.com) lo que obviamente no todo el mundo tiene por casa; la otra usa principalmente cartón pluma y 5 bases de 2x2cm de miniaturas como las que tiene cualquiera tiradas por casa a porrón.
El proyecto empieza y termina en el mismo día (de hecho se ha comido una mañana y un poco de una tarde), y a diferencia de otros proyectos no parte de unos bocetos iniciales ni de un plan definido sino tan solo de un "vamos a ver qué se puede poner encima de un CD".
Building the Fuel Catalyst Converter
Why a "Fuel Catalyst Converter"? because I have no idea what else could be a block of fururistic tubes panels and "danger" signs with a hatch on top!... but I'm pretty sure that it catalyzes something... even if it catalyzes the unstable and dangerous ENOL fuel mix used by the dropships of the XXII century.
As I said befor, apart from the CD for the base I'me using some pieces casted using Hirst Arts plaster molds, you probably don't have any of them but I give you this advice, give them a try!!
Building has no mistery at all, the plaster pieces should be dry, you should use white glue to fix them up and you better use a Lego (or similar pieces) 90 degrees form to ensure a correct building. You can find much more in the "tips and tricks" section of Hirst Arts page.
Montando el catalizador
¿Por qué un "catalizador"? Porque no se me ocurre que cosa futurista puede ser un cubo con una portilla encima y tubos por doquier además de varios carteles de peligro... pero seguro que algo cataliza... aunque sea la muy poco estable mezcla de combustilbe ENOL que utilizan los transbordadores del futuro.
Como comentaba antes estoy usando a parte del CD que hace de base una serie de piezas vaciadas en escayola, esto es algo que seguramente no tengais la mayoría (aunque os recomiendo que alguna vez hagáis la inversión y probéis con algún molde). El montaje no tiene ningún misterio, escayola bien seca (las piezas frescas no pegan y estas deben llevar como 2 años secándose), cola blanca y a ser posible una escuadra hecha con lego o similar para poder mantener siempre los 90 grados.
The only complex part in the process is to glue the box to the CD, I (as always) solve this with
lots of hot glue... the hot glue gun is a must have for any crafting adept, with your hot glue gun
you can turn any piece of trash into nice scenery and much more!
La única parte con mas compegidad del montaje es el pegado al CD, pero nada que no se solucione
con unas cantidades generosas de pegamento termofusible... la piedra filosofal de cualquier aficionado
a las manualidades, con una pistola de pegamento podrás convertir cualquier basura en escenografía (¡y mucho más!).
Paint job
One of the targets of this two mini-projects is to make them easy and make them quick to build and paint, so with the paintjob I tryed to find the better visuals with the less time consumption.
First I go on a light grey base coat with spray (it will be very time-effective as painting with brush over a detailed plaster pieces is a hell on earth), then you shoudl rush paint with some very basic colors the details, in this case green, red and yellow for some of the tubes, yellow sides for the "danger" stripes around the roof, a blue-gray for the roof too and a creamy brown for some panels on the sides.
You can see in the photos the roughness of this rush job but... the magic is done in the next step!.
El Pintado
Uno de los objetivos de estos dos mini proyectos era que fuesen fáciles y sobretodo rápidos de hacer, es decir que con el pintado he buscado el mayor impacto visual con el mínimo consumo de tiempo.
Primero una capa base de gris a spray (que te ahorra muchísimo tiempo sobretodo con cosas de escayola) y después pintar a la carrera con los 4 o 5 colores básicos que se quieren, en este caso algunas tuberías en verde, rojo y amarillo, el reborde amarillo para la línea de peligro, un azul grisáceo para partes del techo y un color cremoso para algunos detalles.
Como podéis ver en la foto todo está hecho a la carrera y cutremente puesto que la magia la incluimos en el siguiente paso.
Shoe polish trick
Hirst (the plaster molds guy, you know) discovered a very nice trick I didn't used before for plaster scenry, that turns out to be quite simple and effective. To do it we need some liquid black shoe polish, a brush and some cotton pieces (the cotton disks used to de-makeup are perfect).
With the brush we apply a generous layer of shoe polish and quickly we wipe it off with the cotton, like that everything gets darkened and the deeper parts looks even deeper, it is a kind of magic!!!... To achieve a very good results we spent a very little time (which was our prime objective). Try brushing only small zones to keep the polish under control. Large areas could dry qickly making the effect to look weird.
At the end, with all darkened, we use a CD black marker to end the danger yellow and black line. And then we finish the paint job with a qick and rush dry brush of silver (the whole structure should look metallic).
Finishing touch is to put in some advice and danger signals and panels, you can get them here: Signals and panels.
El truco del betún de zapatos
Hirst (el fabricante de los moldes de escayola) me descubrió un truco que no había utilizado aún y que para escenografía es bastante convincente. Necesitamos para ello betún líquido de zapatos negro (0,65 en un todo a 100) una brocha y unas esponjitas de algodón (de las que se usan para desmaquillar).
Con la brocha aplicamos generosamente el betún y lo retiramos rápidamente con el algodón, de forma que todo adquiere relieve y se oscurece como por arte de magia... para un resultado muy bueno hemos invertido una nadería de tiempo (que era el objetivo que buscábamos).
Finalmente, con todo ya oscurecido, usamos un rotulador de CDs para finiquitar la línea amarilla y negra de peligro y rematamos con un poco de brocha seca plateada.
El último punto consiste en incluir unas cuantas señales de aviso, las podéis descargar aquí: Paneles y Señales.
Building the Bunker/Shelter
This other small project is made solely to use some 20mm square bases just like if they are the small looking windows of a bunker (or weather/radiation shelter).
Using the angled sides of the bases we can glue five of them making the half of a decagon shape. To complete the front part of the bunker we use 5 foamcore prisms, 3cm base, 2cm roof and 3cm high. That will give us a rough 5cm high building.
The sides of this pieces should have a visel done with a scissors to fix them up more accurately to the base and between each other.
Montando el Refugio/Bunker
Este proyecto parte única y exclusivamente de utilizar unas bases de 20mm cuadradas para usarlas por la parte de atrás como si fuesen las ranuras de visión de un búnker o de un refugio anti-tormenta, anti-radiación o en general anti-aburrimiento.
Aprovechando el viselado de las bases podemos pegar 5 formando mas o menos la mitad de un decágono. Para completar la parte frontal corto además 5 prismas de cartón pluma de 3cm de base, 2cm de techo y una altura de 3cm. Con eso (a ojo) conseguiremos un "edificio" con unos 5cm de altura.
Los prismas están también viselados, lo mejor es hacerlo no con cutter sino cortando con una tijera.
Structure was complete with two 4,5cm x 4cm side panels and the back (entrance) panel about
4,5cm x 5cm. To make a less square structure we finish the shape with two 3cm side triangles
to join the front ricochet-friendly panels and the side panels.
All the process is a rush job, with hot glue gun, foam core and instinctive measures not very accurate. But as you can see results are rather good, indeed!.
The roof of the bunker is an irregular octogonal shape of foamcore. Not much to say about the roof.
All the process is a rush job, with hot glue gun, foam core and instinctive measures not very accurate. But as you can see results are rather good, indeed!.
The roof of the bunker is an irregular octogonal shape of foamcore. Not much to say about the roof.
La estructura se completa con dos paredes laterales de 4,5cm x 4cm y la entrada trasera
con un panel de 4,5cm x 5cm. Para que la estructura no sea tan cuadrada remato con dos triángulos de
3cm x 3cm que unen las partes delanteras de cartón pluma con las laterales.
Todo el montaje está hecho a lo burro, con pegamento termofusible y sin tomar unas mediciones ni precisas ni premeditadas, sin embargo el resultado con un poco de buena mano ya lo veis.
El techo de la estructura es una pieza octogonal (irregular) de cartón pluma. No hay mucho mas que decir de ella.
Todo el montaje está hecho a lo burro, con pegamento termofusible y sin tomar unas mediciones ni precisas ni premeditadas, sin embargo el resultado con un poco de buena mano ya lo veis.
El techo de la estructura es una pieza octogonal (irregular) de cartón pluma. No hay mucho mas que decir de ella.
Paint job
To paint the bunker I used an old, quick and effective tool as the sponge, with this technique we can finish the piece in a glance. For the Oxide Stains I used an earth brown, with a thin brush you leave a drop of paint and then with a cotton stick you blend it down, results are very good looking yet very quick to achieve. In the roof I used an old wedge stencil, not much to say about it.
Just like the previous piece the results are a lot better if you put in some signals and panels.
El Pintado
Para el pintado he usado una técnica tan vieja como efectiva como es la esponja, con esa técnica podemos terminar la pieza en un momento. Para las manchas de óxido y guarrería he usado un marrón tierra, con un pincel se dá un goterón e inmediatamente ese goterón se corre hacia abajo con un bastoncillo de algodón, el resultado es tan efectivo como rápido. A parte para el techo he usado un stencil de flechas que tenía por ahí, no hay mucho mas que decir del mismo.
Y al igual que con la pieza anterior, todo queda mucho mas vistoso pegándole algunos Paneles y Señales.
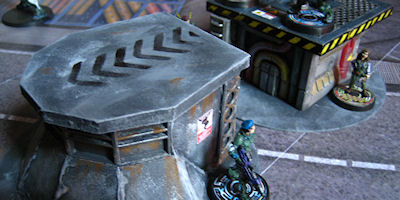
PHOTOS OF THE FINISHED JOB
And finally it is done, in not much time we have finished two eye fancy scenery pieces that will fit very well in our gaming table with that cool futuristic looking we were looking for, and we almost spent no more than a morning finishing them!.
FOTOS DEL TRABAJO FINALIZADO
Y ya está, en muy poco tiempo hemos terminado dos piezas de relleno que cuadrarán perfectamente en esa escenografía futurista que estamos buscando, sobre la mesa quedarán bien vistosas y no habremos invertido mas de una mañana y algo mas en empezar y terminar.